Let’s say you are working in the newspaper industry as an editor and you receive thousands of stories every day. How will you find the story which is related to specific sections like sports, politics, etc? Will you go through all of these stories? No, right?

How about a system that helps you segment into different categories? The system may also perform sophisticated tasks like separating stories city wise, identifying the person names involved in the story, organizations and so on.
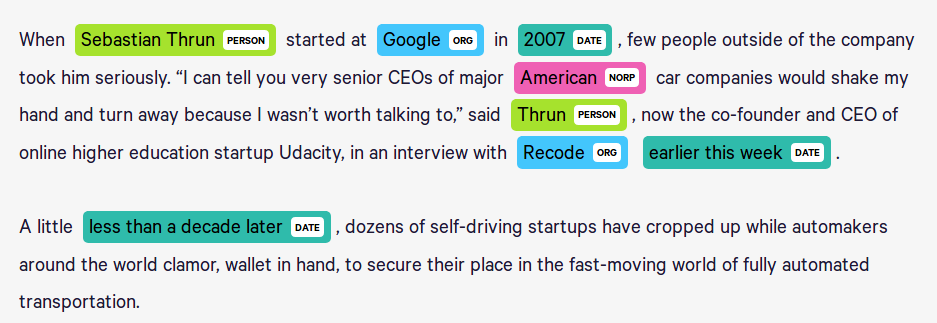
In this post, I will introduce you to something called Named Entity Recognition (NER). The task of NER is to find the type of words in the texts.

Table of contents :
Introduction
Prerequisite
Understanding the data
NER using Conditional Random Fields (CRFs)
Feature Preparation for CRF
Training the model with scikit-learn
Evaluating the model performance
NER with Bidirectional LSTM - CRF
Defining the model parameters
Model Architecture
Visualizing the performance
Evaluation
Conclusion and FutureWork
1. Introduction:
In Natural Language Processing (NLP) an Entity Recognition is one of the common problem. The entity is referred to as the part of the text that is interested in. In NLP, NER is a method of extracting the relevant information from a large corpus and classifying those entities into predefined categories such as location, organization, name and so on. This is a simple example and one can come up with complex entity recognition related to domain-specific with the problem at hand.
2. Prerequisites:
This post assumes that you are familiar with:
Fundamental concepts of Machine Learning and Neural Network
LSTM network working in Python and Keras
Conditional Random Fields (CRFs)
You can refer to my last blog postfor a detailed explanation about the CRF model.
3. Understanding the data:
I have used the dataset from kaggle for this post. This dataset is extracted from GMB(Groningen Meaning Bank) corpus which is tagged, annotated and built specifically to train the classifier to predict named entities such as name, location, etc.
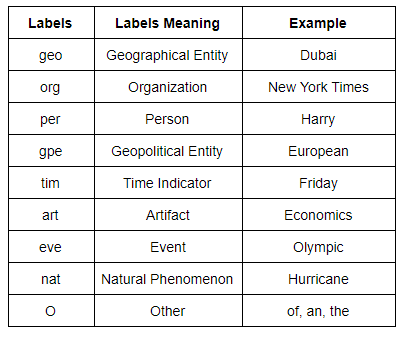
All the entities are labeled using the BIO scheme, where each entity label is prefixed with either B or I letter. B- denotes the beginning and I- inside of an entity. The words which are not of interest are labeled with 0 - tag.
Below table shows the detailed information about labels of the words.
Reading the CSV file and displaying the first 10 rows.
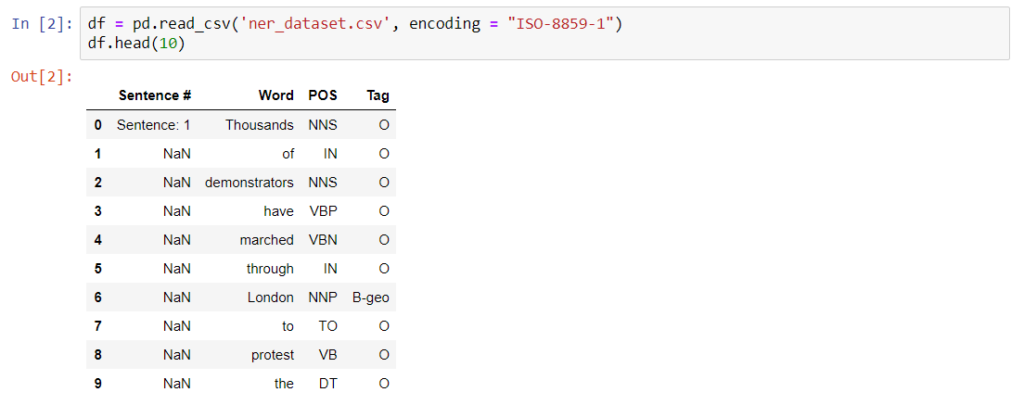
As you can see Sentence # indicates the sentence number and each sentence comprises of words that are labeled using the BIO scheme in the tag column.
This particular dataset has 47959 sentences and 35178 unique words. For preprocessing steps, you can refer to my Github repository.
Let’s display the first sentence.

4. NER using Conditional Random Fields (CRFs):
CRFs are used for predicting the sequences that use the contextual information to add information which will be used by the model to make a correct prediction.
Below is the formula for CRF where y is the output variable and X is input sequence.

The output sequence is modeled as the normalized product of the feature function.
You can refer to my previous post, where I have explained in detail about CRFs along with its derivation.
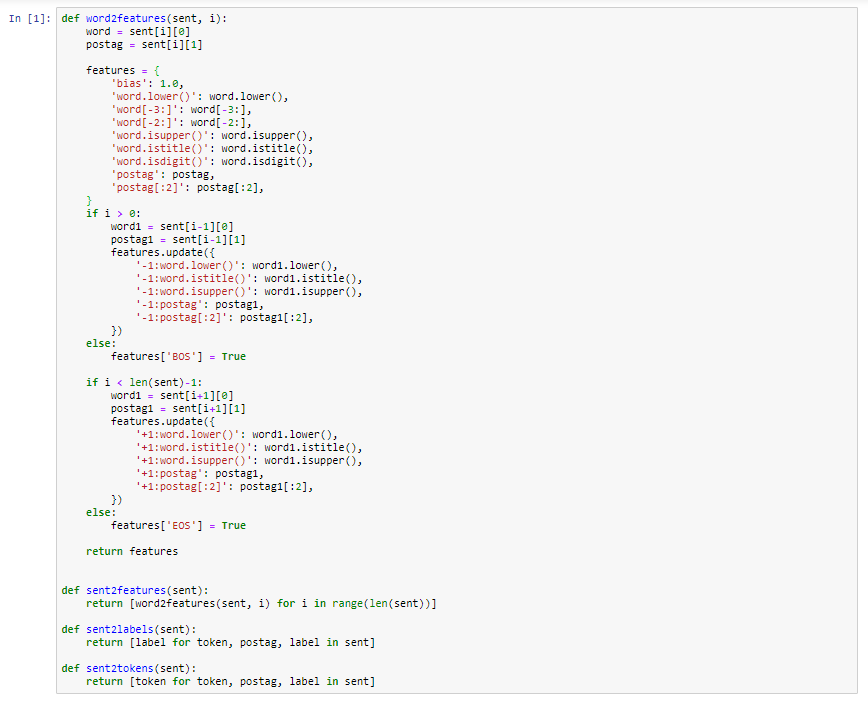
4.1 Feature Preparation for CRF:
Below are the default features used by the NER in nltk. One can also modify it for customization and can improve the accuracy of the model.
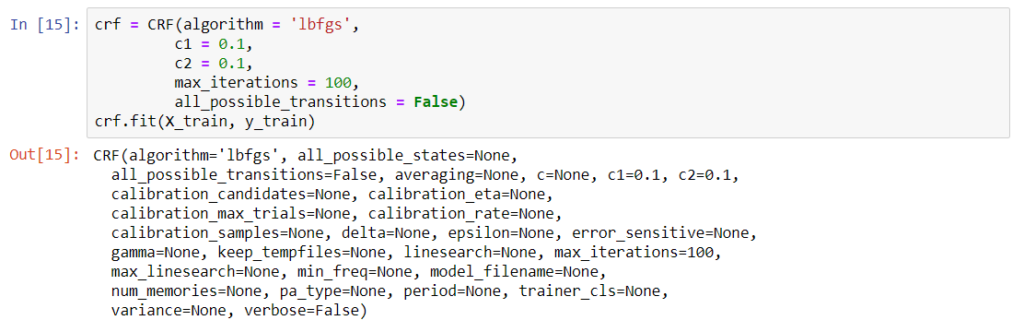
4.2 Training the model with scikit-learn:
We can now train the model with conditional random fields implementation provided by the sklearn-crfsuite. Initializing the model instance and fitting the training data with the fit method.
4.3 Evaluating the model performance:
We will use precision, recall and f1-score metrics to evaluate the performance of the model since the accuracy is not a good metric for this dataset because we have an unequal number of data points in each class.
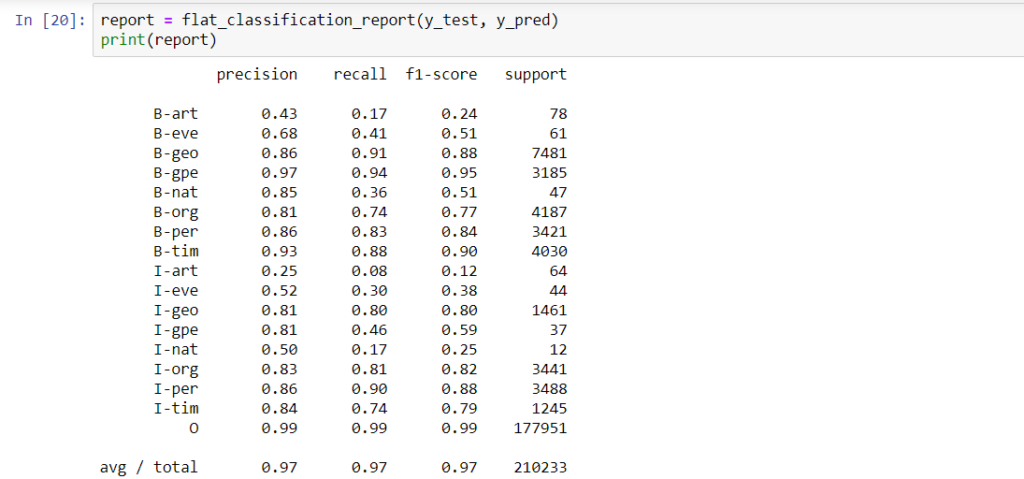
The results look pretty good.
5. NER with Bidirectional LSTM - CRF:
In this section, we combine the bidirectional LSTM model with the CRF model. This approach is called a Bi LSTM-CRF model which is the state-of-the approach to named entity recognition. The LSTM (Long Short Term Memory) is a special type of Recurrent Neural Network to process the sequence of data.
5.1 Defining the model parameters:

If you know what these parameters mean then you can play around it and can get good results.
5.2 Model Architecture:
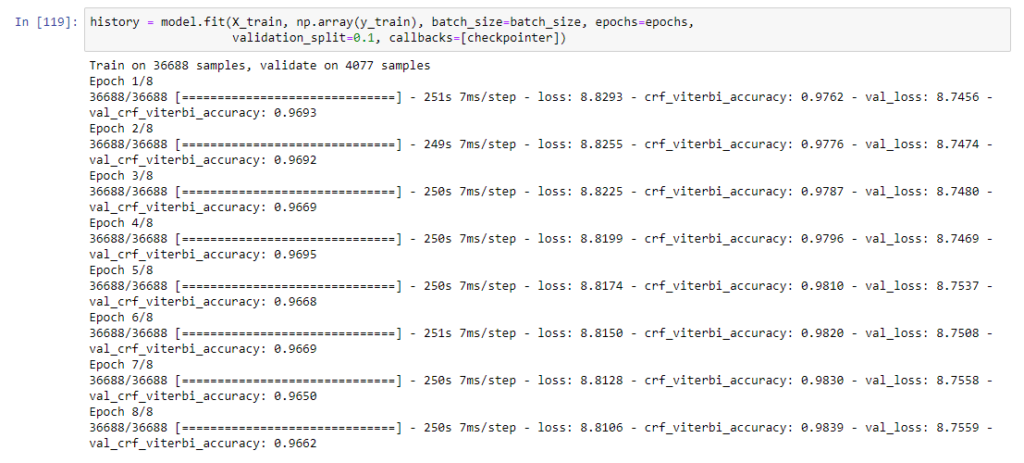
Now we can define the recurrent neural network architecture and fit the LSTM network with training data.
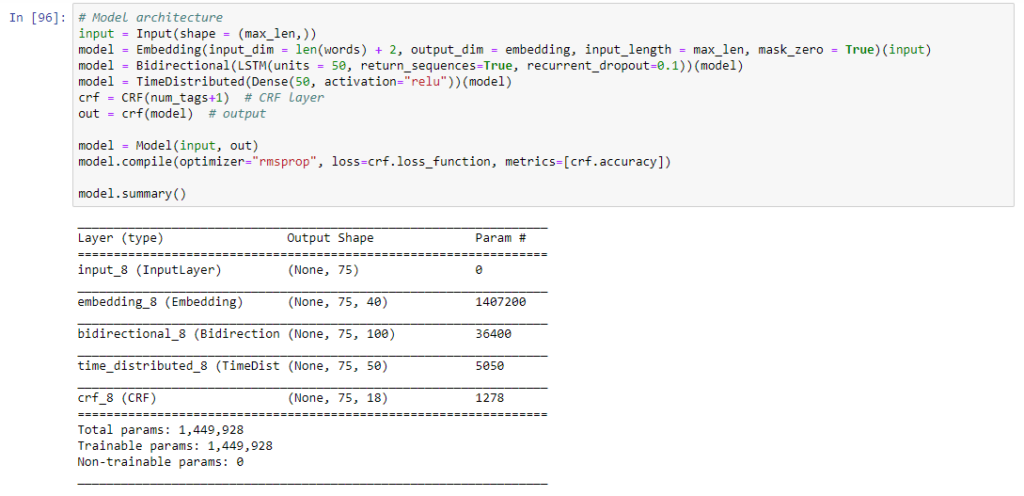
I have used keras callback() function.
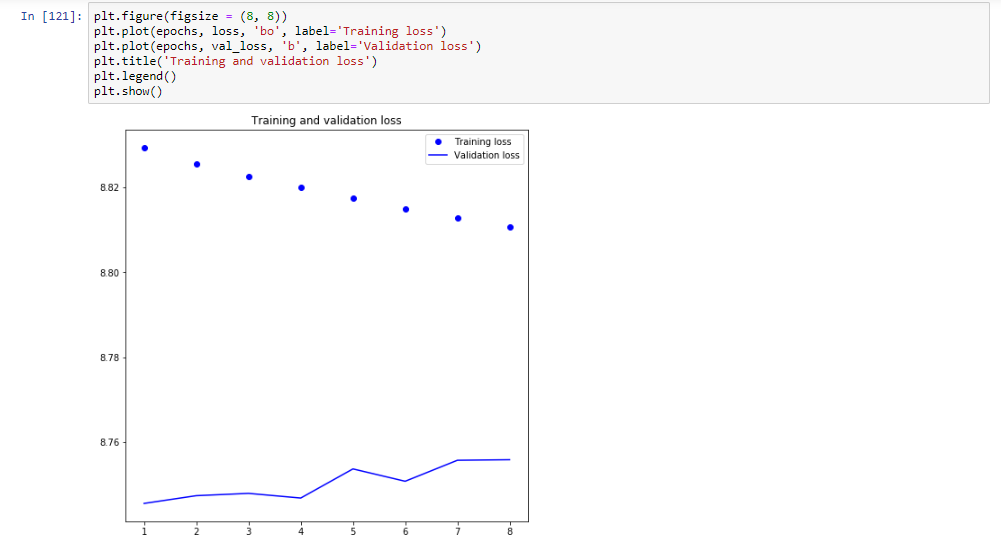
5.3 Visualizing the model performance:
Here we will plot the graph between the loss and number of epochs for training and validation set.
Classification report.
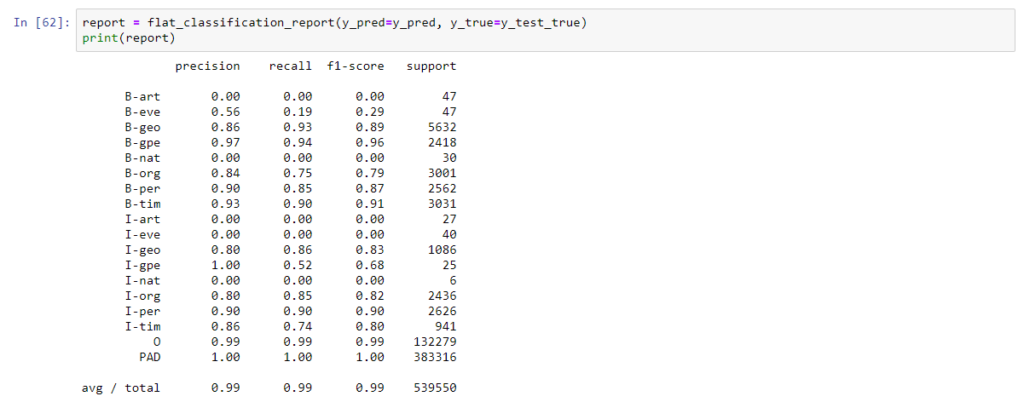
You can see that the model has beat the performance from the last section.
6. Evaluation:
Let’s try to identify entities from test data sentences which are not seen by the model during training to understand how the model is performing well.
At every execution, the below code randomly picks the sentences from test data and predicts the labels for it.
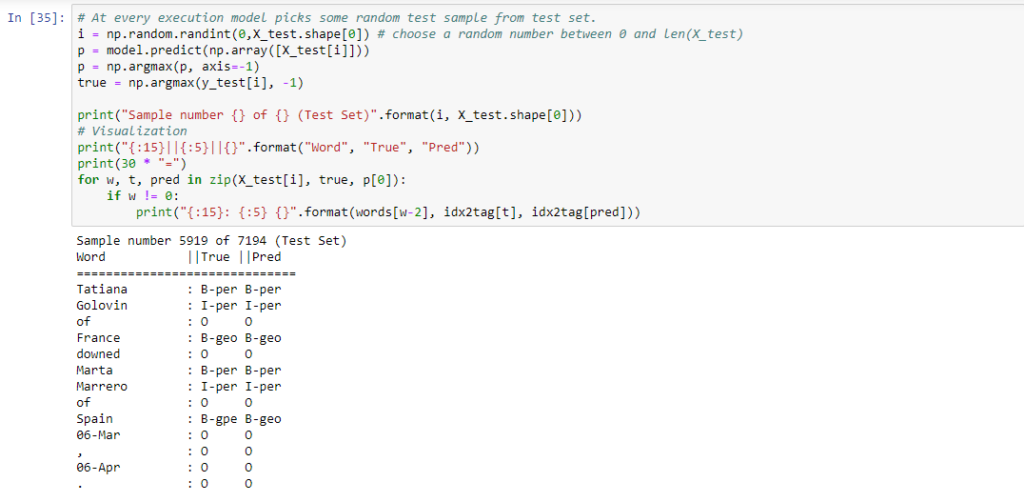
Now we can easily compare the predictions of the model with actual predictions.
Important Point:
We must understand the model trained here can only able to recognize the common entities like location, person, etc. One can build a complex model for predicting the chemical entities, medicines, etc but for such a task, preparation and labeling of the dataset would be challenging.
7. Conclusion and Future work:
This is the first cut solution for this problem and one can make modifications to improve the solution by:
Changing model hyperparameters like the number of epochs, embedding dimensions, batch size, dropout rate, activations and so on.
Using larger dataset. Here we have used only 47959 sentences which are very few to build a good model for entity recognition problem.
Using pre-trained word embeddings.
Using character level embedding for LSTM.
Fine tuning of the BERT model.
Improve the vocabulary by adding the unknown tokens which appeared at test time by replacing the all uncommon word on which we trained the model. We have not done this for sec of simplicity.
Please refer to my Github repository to get full code written in Jupyter Notebook.